First, let’s go over why using Google Analytics to monitor your website is important. Google Analytics is a powerful tool that does all the hard work for you. It collects a lot of data about the users on your website to help you determine how to best market to your customers. It can also help you figure out where you can improve your business. Learn about some of the most helpful metrics you can track in our Google Analytics 101: Navigate and Track blog. Plus, it’s completely free to use – yes, completely.
Setting up your Google Analytics account is really simple – you don’t even need a Gmail account to use it! However, if you do have a Gmail account, we’d recommend using it so everything is linked together under the same email address. Any Google platform can be “linked” together (Analytics, AdWords, Google My Business, YouTube, etc), which simply means you’re using the same email and password for each platform. And if you’re already signed into one, you’ll automatically be signed into the others by default. Having them linked under the same email address makes it a lot easier to fully manage your business and the associated accounts.
Step 1: Go to analytics.google.com to set up your account. Fill in the fields for your new account.

Step 2: Click “Get Tracking ID” – the “UA-“ code is your tracking ID, but you’ll need to use the full code in the “Global Site Tag” box on your website (see Image 1 below). If you have someone who manages your website for you, send them this entire code (we recommend pasting it into a “Notes” file and sending it over).
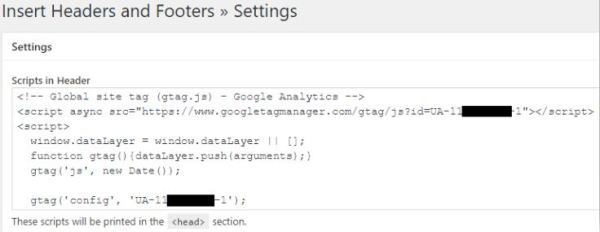
If you’re doing it yourself, it will depend on the website platform you’re using. Ultimately, it needs to go into the <HEAD> code of your website. Many website platforms (such as Wix or WordPress via a plugin – see example in Image 2a and 2b below) have a designated area to put the code or ID that will automatically apply it across your whole website.
You May Also Like: Social Media 101: What Retailers Need To Know
Image 1:
![]()
Image 2a:

Image 2b:
Step 3: Once the code has been added to the website, you can “Send test traffic” (see Image 1 above) to test if the code is working properly OR you can wait a day or two to see if data comes through correctly. To check the data after a couple of days, go to the Audience section of your account. Select “Overview” underneath it and see if there is any data showing up. (*Note: You can alter the date for the data in the upper right corner; hover over the section titles to get a box that defines that data).

To learn more about Google Analytics and the important metrics you can track, check our next blog, Google Analytics 101: Navigate and Track. We’ll show you how to navigate the tool and find the metrics you need to better your business.
